Prototype Manufacturing in Product Design & Development [2026]
Learn what prototype manufacturing is, how the process works, and how to use it in product development to build scalable products & bring them to market faster.
![Prototype Manufacturing in Product Design & Development [2026]](https://ontariodynamics.com/wp-content/uploads/2026/04/Prototype-Manufacturing_-Closing-the-Gap-from-Concept-to-Market-1024x536.png)
What Is Prototype Manufacturing?
Prototype manufacturing is the process of building a physical or functional version of a product before committing to full-scale production. It covers everything from early sketch models and proof-of-concept builds through pre-production alpha units that validate the design against real manufacturing conditions. The goal at every stage is to answer a specific question about the product as cheaply as possible, before moving forward.
Key Takeaways
- Prototype manufacturing is not a single build, it is a staged process with a different objective at each phase
- A design change at concept stage costs hours in CAD; the same change after production tooling is cut costs $15,000 to $150,000
- Manufacturing prototypes require DFM input at every stage, not just before tooling
- Moving from prototype to manufacturing without a documented production handoff is one of the most common causes of rework and delay
- Most products need three to five prototype iterations before production readiness
Table of Contents
- What Is Prototype Manufacturing?
- The Prototype Manufacturing Process: Step by Step
- Types of Prototypes in Product Development
- Prototype to Manufacturing: What the Transition Actually Requires
- How to Find a Prototype to Manufacturing Company
- Prototype Manufacturing vs Production: Key Differences
- Practical Tips for Successful Prototype Fabrication
- Conclusion
- FAQ
A design change at concept stage costs an hour in CAD. The same change at prototype stage costs days and a fabrication run. After production tooling is cut, that same change costs $15,000 to $150,000 before launch delay is factored in.
Prototype manufacturing exists to catch those changes at the cheapest possible moment. It is the structured process of building, testing, and refining physical versions of a product before any production investment is committed. Done correctly, it is what separates the products that reach market on time from the ones that absorb their entire margin in rework.
This guide covers the full prototype manufacturing process, the methods used at each stage, how to manage the prototype to manufacturing transition, and what to look for when choosing a development partner.

What Is Prototype Manufacturing?
Prototype manufacturing is the process of producing physical or functional representations of a product at each stage of development, before full-scale prototype production begins. It is not one build. It is a sequence of builds, each answering a specific question about the design.
Every major product on the market today went through multiple rounds of manufacturing prototypes before reaching volume production. The smartphone, the industrial pump, the medical device, each one went through appearance models, functional builds, and pre-production validation units before a single production part was made.
Prototype fabrication serves four core purposes in product development:
- Validating that the design works as intended before production investment
- Identifying design flaws when they are still cheap to fix
- Providing a physical basis for DFM review and manufacturing planning
- Producing the documentation that feeds directly into production
Product development prototype work is also where most budget overruns begin, not because prototyping is inherently expensive, but because teams build the wrong type of prototype for the question they are trying to answer.
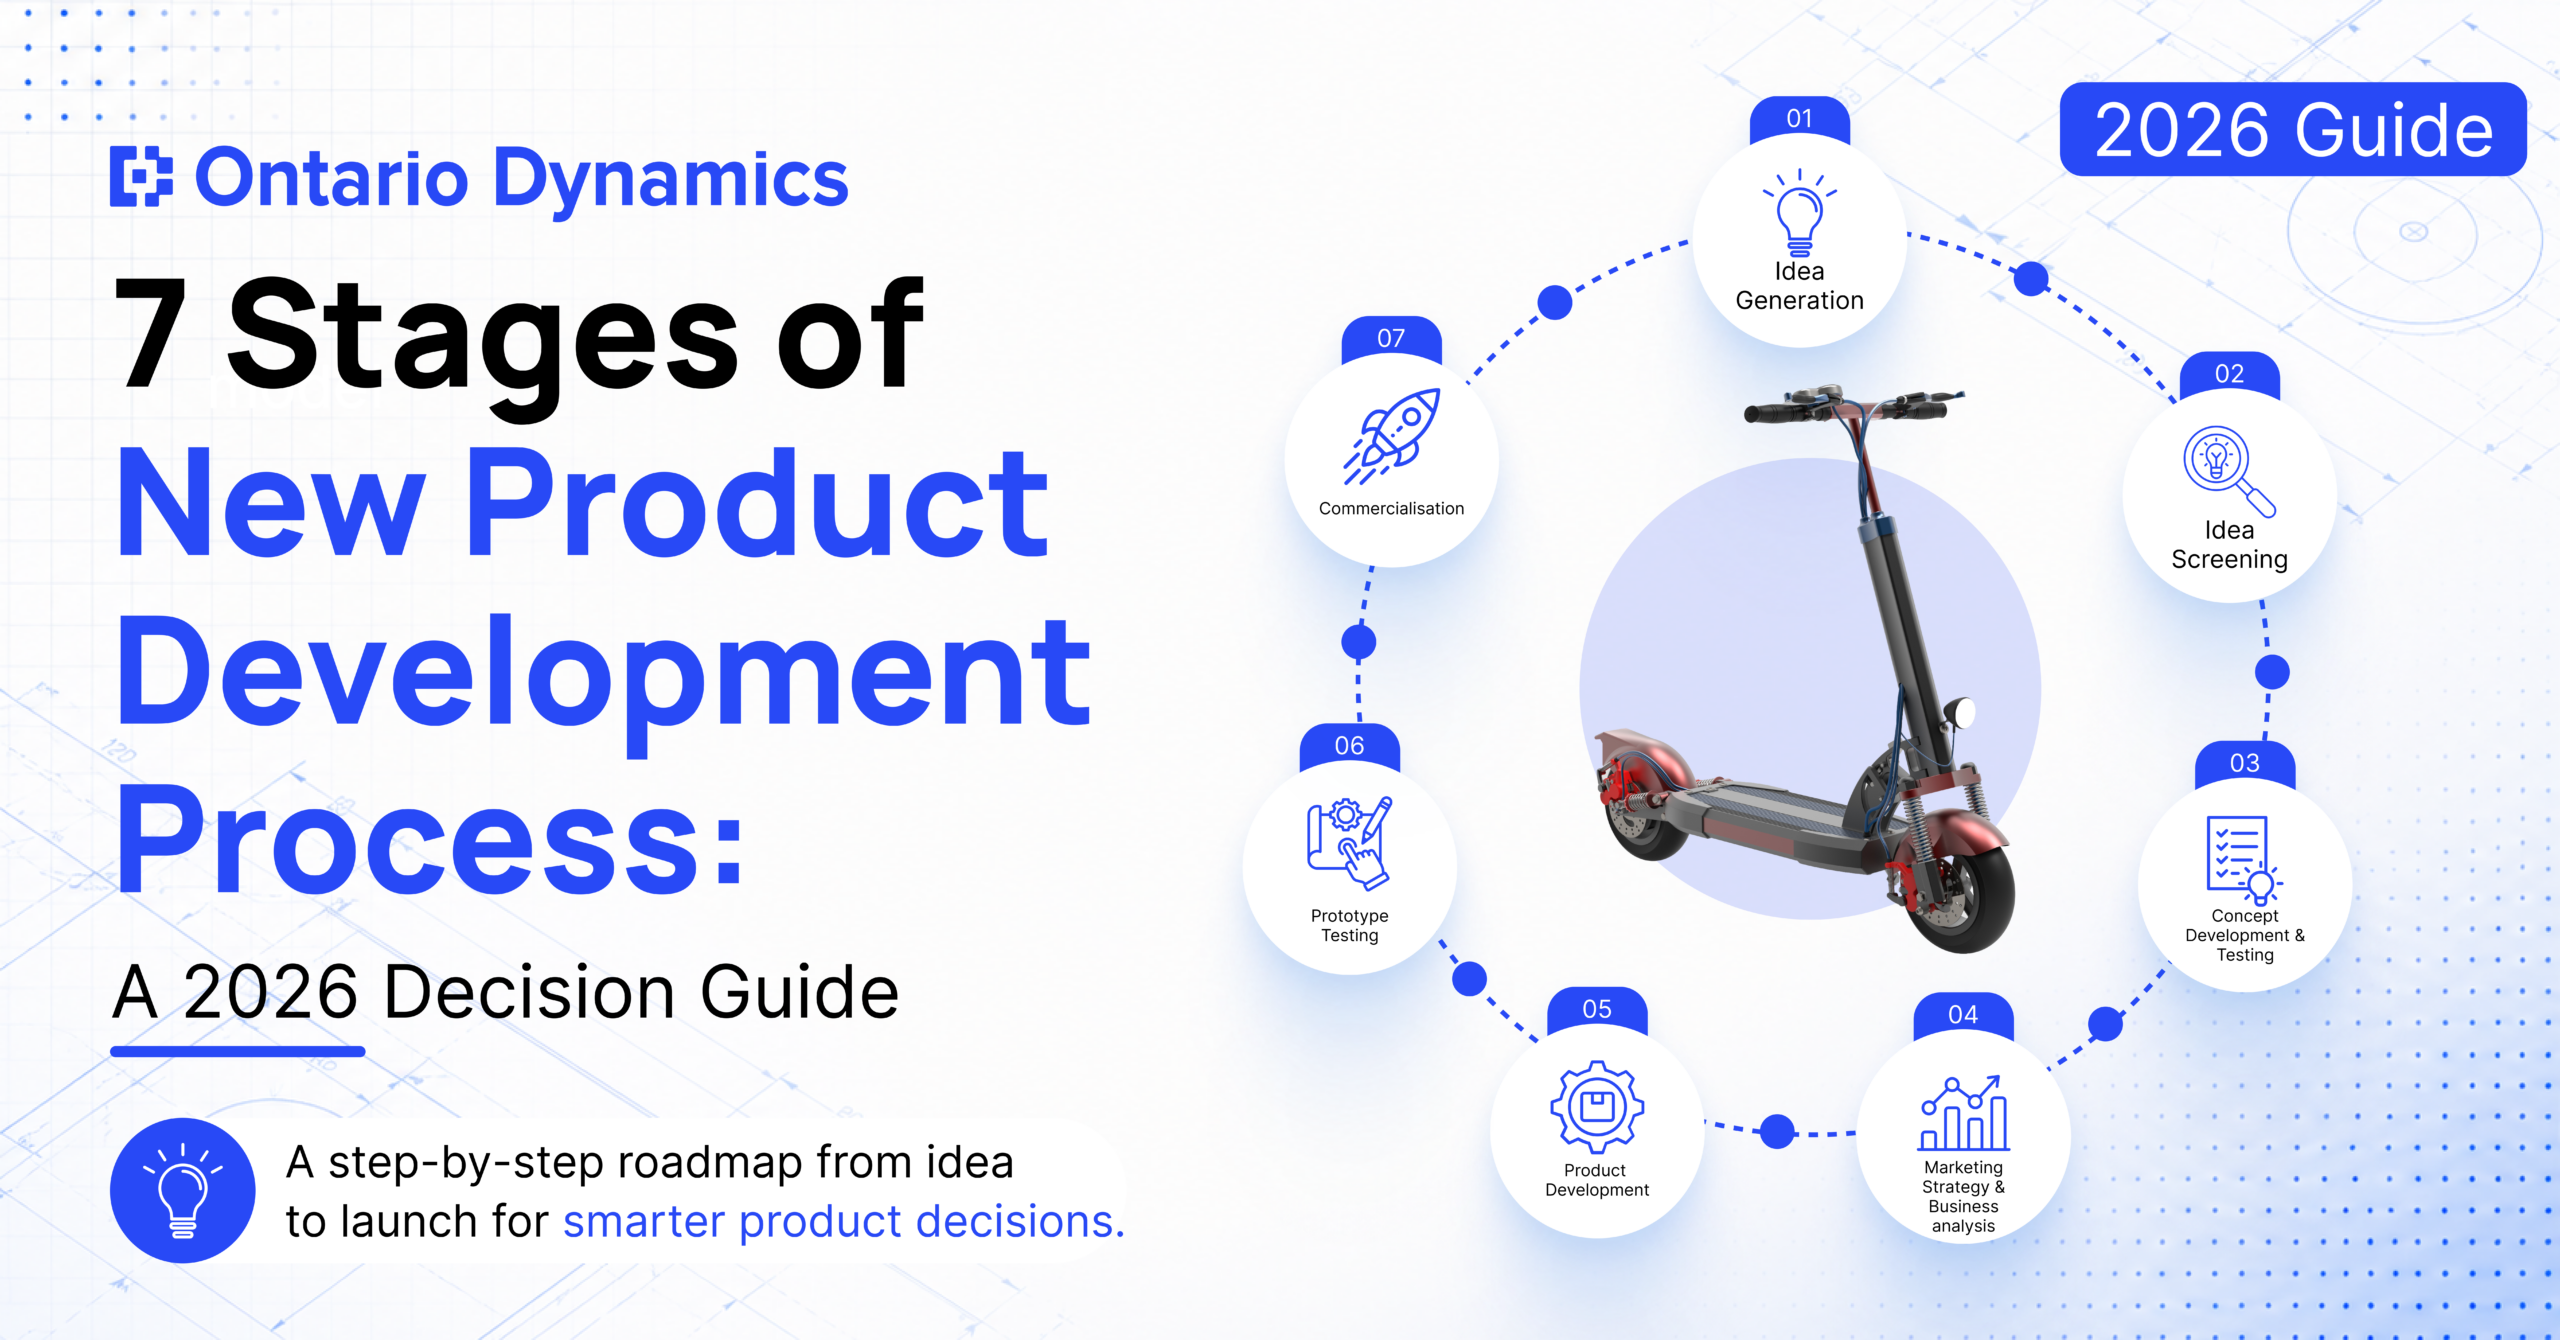
The Prototype Manufacturing Process: Step by Step
The prototype manufacturing process follows five stages. Each stage builds on the last. Skipping one does not save time, it typically adds it back later at higher cost.
Step 1: Conceptualisation and Design
Every prototype starts as a design objective. What question does this build need to answer? Appearance and form, core mechanism feasibility, dimensional fit, or full functional performance? Defining that objective before building avoids the most common prototyping mistake: trying to validate everything in one build.
Step 2: Material Selection
Early-stage manufacturing prototype builds often use substitute materials, machined aluminum instead of cast steel, 3D-printed nylon instead of injection-moulded ABS. As the build matures toward pre-production, materials converge with the final production specification. Using production-grade materials too early adds cost without adding useful data. Using substitute materials too late produces misleading test results.
Step 3: Prototype Fabrication
This is where the design becomes physical. Common methods include CNC machining for metal and precision components, 3D printing (FDM, SLA, SLS) for complex geometries and early visual models, vacuum casting for small-batch plastic parts with near-production properties, and sheet metal fabrication for enclosures and structural elements. The method should match the question being answered, not default to the most familiar process.
Step 4: DFM Review and Assembly Integration
Most teams skip this step or treat it as optional. It is neither. A DFM (Design for Manufacturability) review at each prototype design to manufacture stage asks: can this design be produced at scale, at target cost, with available processes? Undercuts, unsupported tolerances, and assembly sequences that require three hands all surface here, when they are still a CAD revision rather than a tooling change.
Step 5: Testing, Iteration, and Documentation
Prototypes are tested against the criteria defined in Step 1. Results drive the next revision. This cycle continues until the design meets all requirements. The output is not just a validated prototype, it is a complete documentation package (drawings, BOM, material specifications, test reports) that a production manufacturer can work from directly.
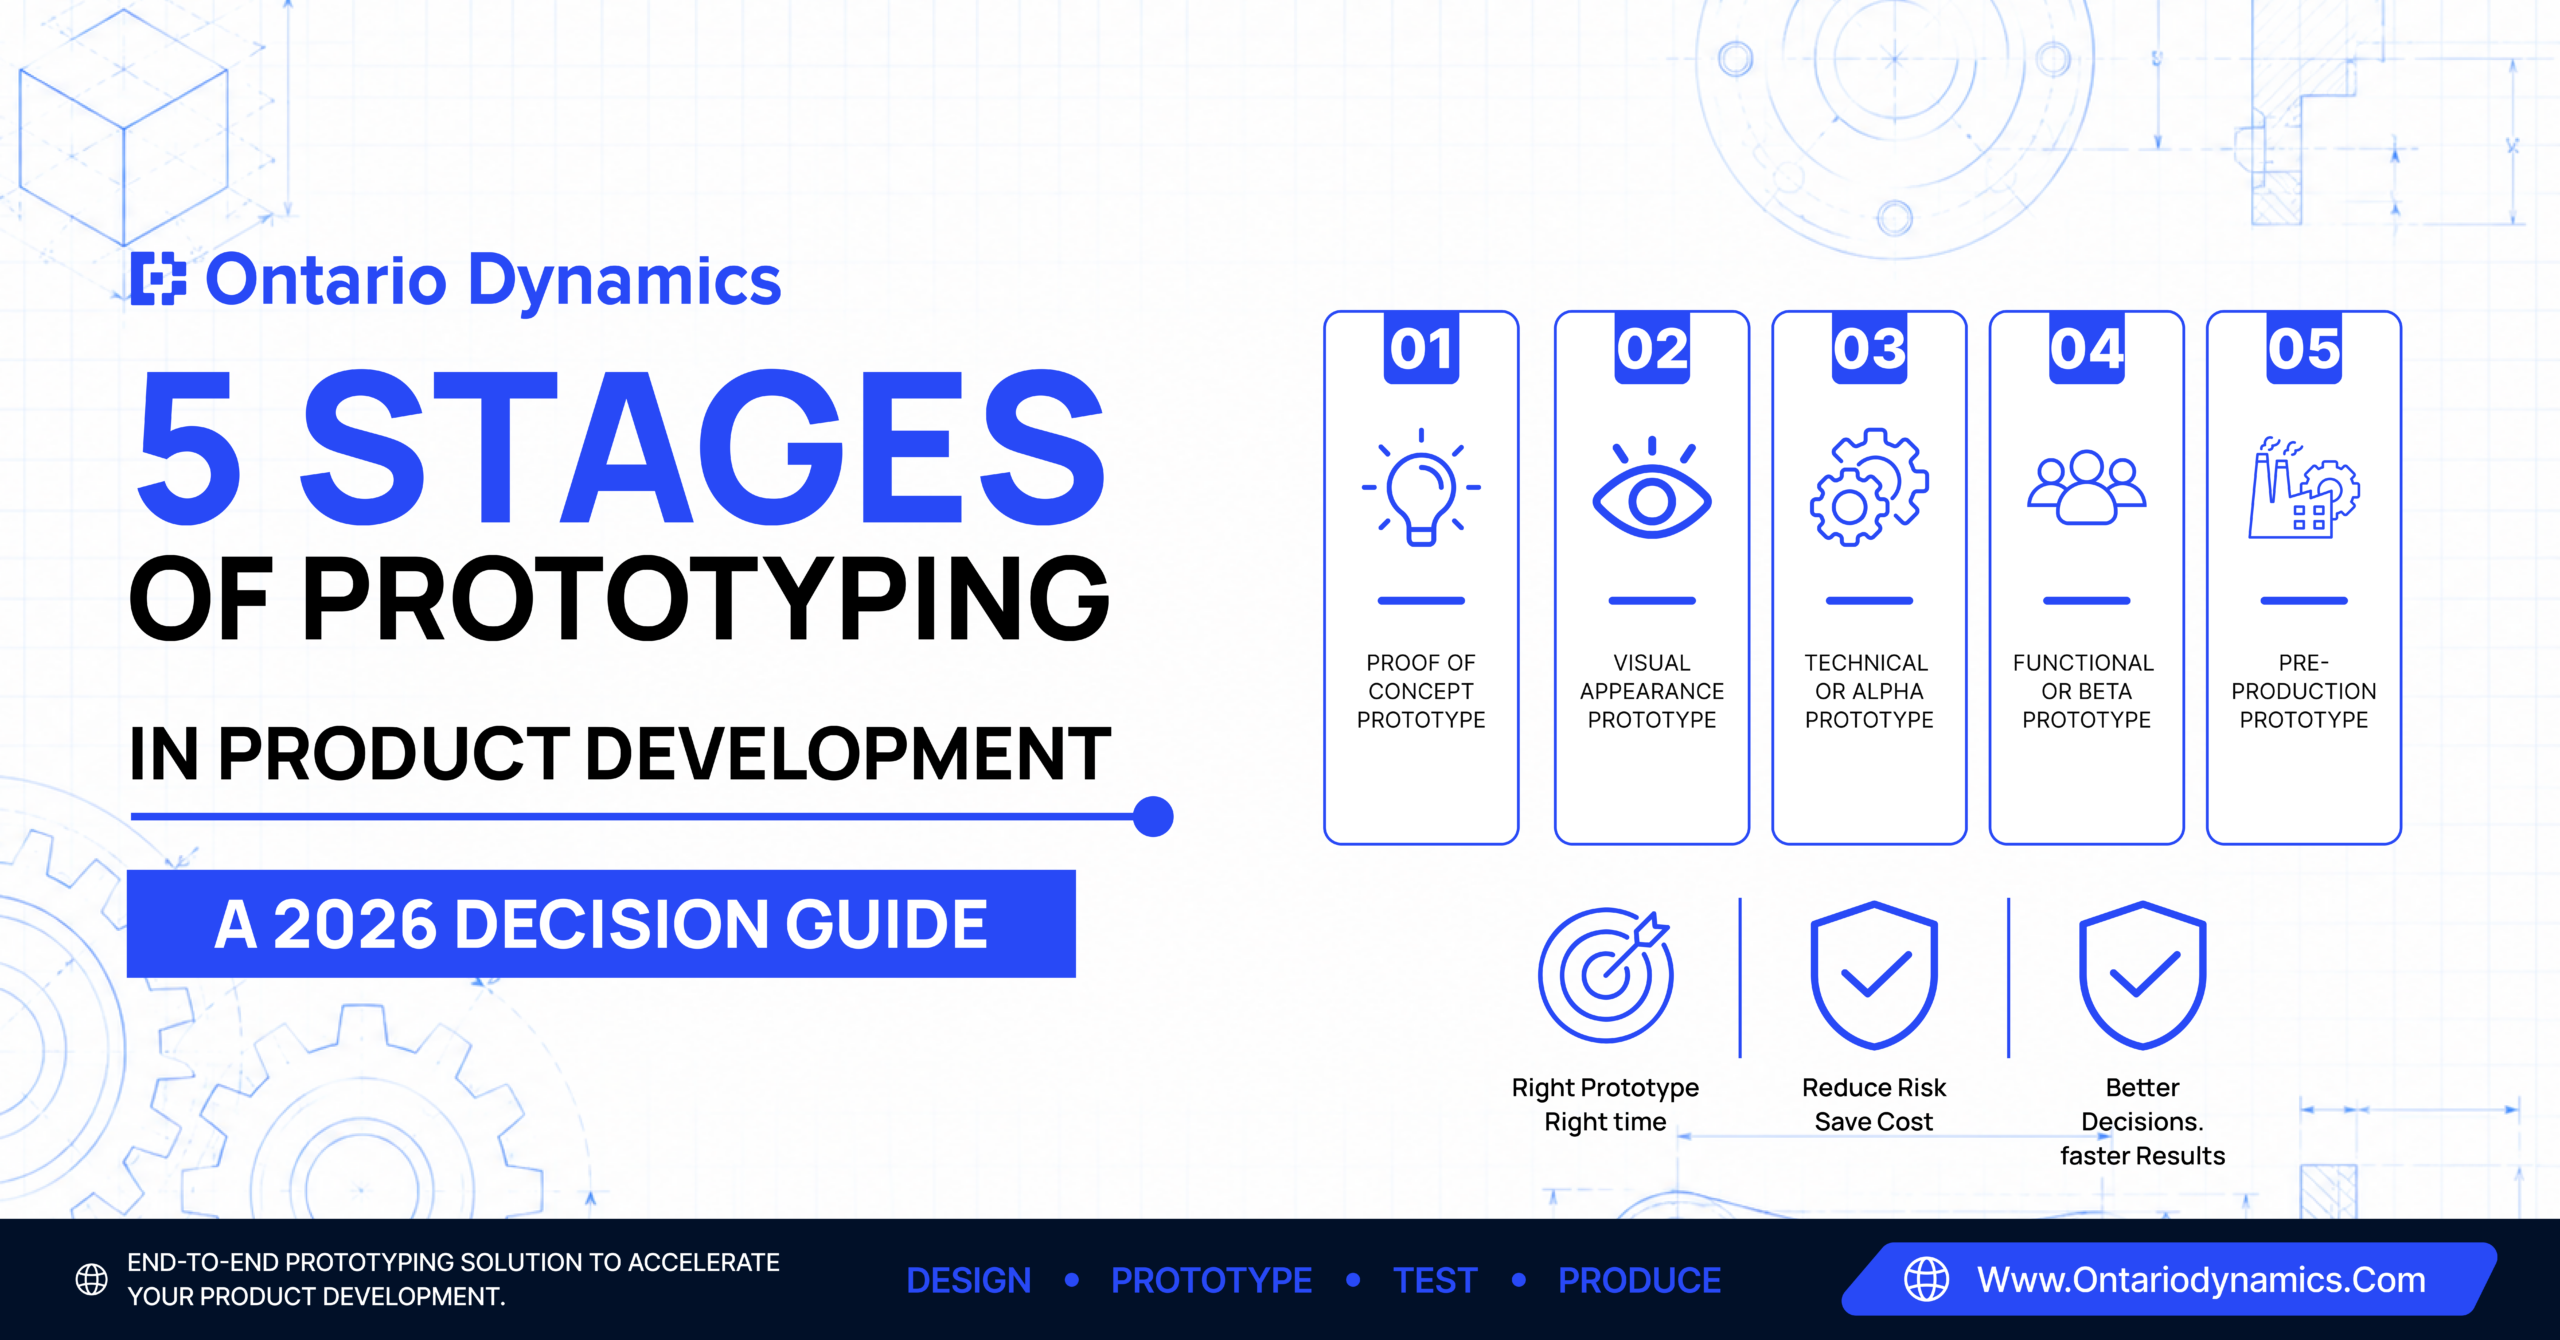
Types of Prototypes in Product Development
Product prototype development moves through distinct prototype types, each serving a different purpose:
Prototype Type | Purpose | Typical Stage |
Sketch or foam model | Form and spatial validation | Ideation |
Proof-of-concept (POC) | Tests core mechanism feasibility | Early development |
Functional prototype | Validates performance under real conditions | Mid development |
Works-like/looks-like build | Combined form and function for user testing | Mid to late |
Alpha prototype | Near-production validation before tooling commitment | Late development |
Production prototype | Validates manufacturability at production scale | Pre-production |
Each type answers a different question. A functional prototype cannot replace a production prototype, and a POC build cannot replace a works-like/looks-like build for investor or user review. Choosing the wrong type for the current stage is how prototype development budgets get spent answering the wrong question.
For differential prototypes assembly, each sub-assembly should go through its own validation cycle before being integrated into the full product build. Treating integration as the first test of each component is what drives late-stage rework.
Prototype to Manufacturing: What the Transition Actually Requires
The prototype to manufacturing transition is where more development projects stall than at any other single point. A prototype that works in the development lab does not automatically translate into a product that can be made efficiently at production scale.
A clean prototype to production manufacturing handoff requires four things:
Complete production documentation. Drawings, BOM, material specs, tolerance stack analysis, and assembly instructions. If any of these are missing, the production manufacturer fills the gaps with assumptions, and those assumptions cost money to fix.
DFM sign-off. Every geometry, tolerance, and material choice confirmed as manufacturable at production volume before tooling is committed.
First-article inspection plan. Defined acceptance criteria for the first production parts, before the full production run begins.
Supplier and process alignment. The production manufacturer has reviewed the design, confirmed process capability, and agreed on inspection requirements before tooling starts.
Teams searching for prototype to manufacturing services should verify that the partner handles all four, not just the physical build. The documentation gap between prototype and production is where most preventable delays happen.
How to Find a Prototype to Manufacturing Company
Finding a manufacturer for your prototype is straightforward. Finding one who can also carry the design through to production without a handoff gap is harder.
When evaluating a prototype to manufacturing firm, ask four questions:
Does the partner provide DFM input during prototyping, or only after the design is frozen? Partners who flag manufacturability issues at the prototype stage prevent the most expensive rework.
Do they produce production documentation as part of the prototype deliverable, or is that a separate scope item? Documentation produced alongside the build is more accurate and less expensive than documentation produced retrospectively.
Can they support the full sequence from mechanical prototype development through alpha and production prototype without requiring a vendor change? Every vendor change is a point of misalignment and delay.
Do they have experience in your specific sector, automotive, industrial, medical, aerospace? OEM rapid prototyping cost and tolerance requirements differ significantly across sectors, and a partner without sector-specific experience will learn on your project.
Prototype manufacturing Savannah and other regionally-specific searches often reflect teams looking for geographic proximity. For Canadian and North American programs, the more important criteria is stage coverage and DFM capability, not location.
Prototype Manufacturing vs Production: Key Differences
Manufacturing and prototyping are not the same process, and the cost and approach differ fundamentally:
Factor | Prototype Manufacturing | Production Manufacturing |
Objective | Validate and iterate | Produce at volume and cost |
Tooling | Soft or no tooling | Hard production tooling |
Labour | Manual, hands-on | Automated or semi-automated |
Inspection | 100% first-article | Statistical sampling |
Documentation | Developed alongside the build | Executed against fixed specs |
Cost per unit | High, setup spread over few parts | Low, setup spread over thousands |
Prototyping manufacturing cost per unit will always be higher than production cost per unit. That is the correct trade-off for a stage where the goal is validation, not volume. The real comparison is not prototype cost versus production cost. It is prototype investment now versus tooling rework cost later.
Practical Tips for Successful Prototype Fabrication
Define the objective before defining the build. Every prototype generation should start with a written statement of what it needs to prove. Builds without clear objectives drift toward over-engineering and over-spending.
Match fidelity to the stage. An appearance model does not need to function. A production prototype does not need to be cheap. Matching the build to the question keeps cost and timeline under control.
Plan for three to five iterations. Teams that budget for one prototype almost always end up spending more than teams that plan the full sequence upfront. Budget the journey, not just the first step.
Protect the design. Before sharing detailed files with any prototype manufacture partner, confirm an NDA is in place. This is standard practice and any credible partner will expect it.
Document every revision. Version-controlled records of what changed, why, and what the test results showed become the foundation of the production documentation package. Teams that skip this documentation rebuild it from memory later, at significant cost.
Conclusion
Prototype manufacturing is the structured process that sits between a product concept and a production-ready design. Each stage, from early product design prototype work through pre-production alpha builds, exists to answer a specific question before the cost of being wrong escalates.
The teams that reach market on time are not the ones who skip prototype stages to move faster. They are the ones who use manufacturing prototypes systematically, match each build to its objective, and manage the prototype and production transition with complete documentation and DFM sign-off.
For startups and manufacturers across Canada working through complex product development prototype programs, Ontario Dynamics provides end-to-end support from first concept sketch through production-ready design, without the handoff gaps that turn prototype delays into launch failures.
Talk to the Ontario Dynamics team about where your project sits in the development sequence. We will tell you what the right next build needs to include.
Ready to Build Your Product?
Let’s turn your idea into a production-ready product engineered for success.
FAQs
Prototype manufacturing is built to validate and iterate. Production manufacturing is built to produce at volume and target cost. The processes, tooling, materials, and inspection approaches are fundamentally different at each stage. Prototype cost per unit is higher, but the purpose is to answer design questions, not to produce at scale.
Start by defining what the prototype needs to prove, appearance, function, dimensional fit, or full performance. That objective determines the build type, which determines the process and the cost. Then find a partner who covers your current stage and has DFM capability built into their process, not added as an afterthought. For a full cost breakdown, see our guide to prototype cost by stage.
Most products require three to five prototype iterations before production readiness. The number depends on product complexity, how many unproven mechanisms are involved, and how thoroughly each stage is validated. Teams that try to compress this into one or two builds almost always need more iterations overall, not fewer.
Four things: complete production documentation (drawings, BOM, material specs, assembly instructions), DFM sign-off confirming every geometry and tolerance is producible at scale, a defined first-article inspection plan, and confirmed supplier and process alignment before tooling starts. Missing any one of these is the most common source of post-prototype rework.
Mechanical prototype development refers to building and validating the physical mechanisms of a product, actuators, linkages, housings, fastener systems, before the full product is assembled. It is used when a product contains mechanisms that have not been proven in production before, or when performance under real load and duty conditions needs to be confirmed before tooling is committed.